
Hi! It's Georgina Ford with my first post on the Craft Stamper blog. The project I have to share with you today is a follow oup from my 'Keep in Tone' article in the current (May 2014) edition of Craft Stamper.
For my blog project I have decorated a 20cm x 10cm papier mache icon. I have used a bright yellow and orange toning colour scheme. I also used the same Floral Greeting stamp set by Hobby Art which I used for my magazine projects.
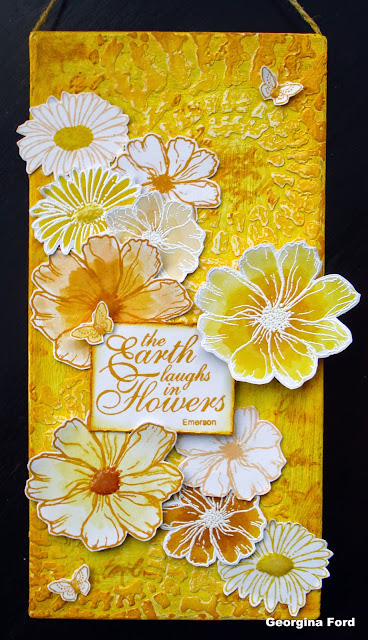
To decorate the icon I started by painting a layer of gesso onto the icon. Once this was dry I added Grunge Paste through a stencil. The stencil I used was Mini Grandma's Doily from The Crafter's Workshop. When the Paste was dry I painted on a layer of Yellow Submarine Fresco Finish paint from PaperArtsy.

When the paint had dried I sanded back the top layer slightly to expose the Paste underneath the paint. Around the edge of the icon I then added Wild Honey and Dried Marigold Distress Ink with a Blending Tool as shown below.

I stamped the script stamp from Hobby Art's Decorative Backgrounds stamp set with Wild Honey and Dried Marigold Distress Ink onto the icon. Once dried the script is slightly blurred but it still looked good for a background as I added the script to break-up the large plain areas of yellow paint.

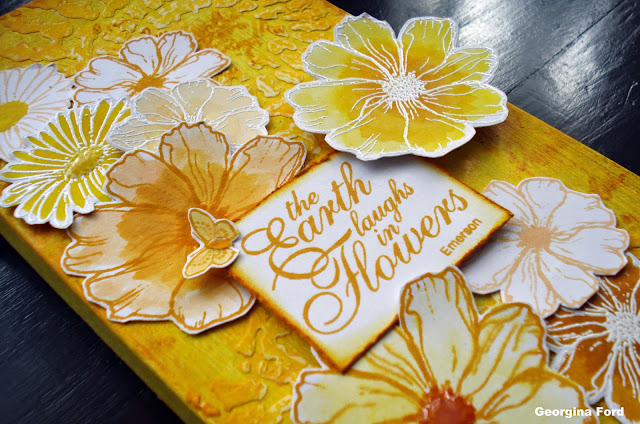
For the flowers I used Hobby Art's Floral Greeting stamp set. I stamped the flowers in Wild Honey, Dried Marigold and Mustard Seed Distress Inks. I also stamped the flowers using a VersaMark ink pad. I then heat embossed these flowers with WOW! Bright White embossing powder. I coloured the flowers using the Distress Ink pads. To do this I stamped the ink pad onto an acrylic block and then added a little water so I could paint with it.

I cut out the flowers and placed them onto the icon before sticking them down. I also stamped a sentiment in Wild Honey. The stamp I used is from Hobby Art's Scene-it Sentiments stamp set. I lightly distressed the edge of the sentiment with Wild Honey, Dried Marigold and Mustard Seed Distress Inks. I added two of the large flowers and the sentiment with foam pads for extra dimension.
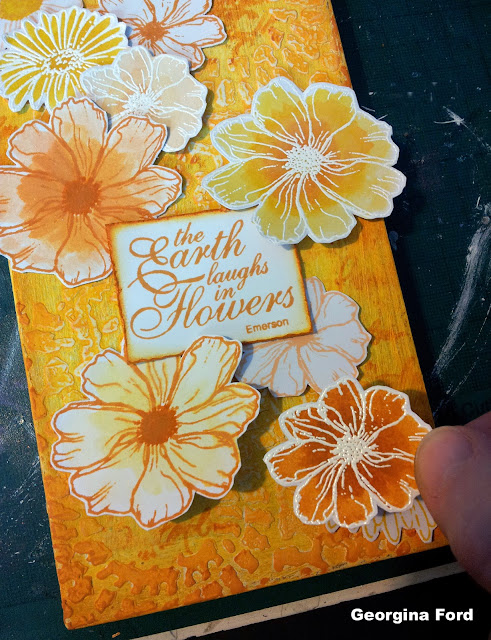
Once all the flowers were in place I stamped and cut out three small butterflies. The butterfly stamp is from Hobby Art's Scene-It Sentiments stamp set. To finish I added Glossy Accents to the centre of a couple of the flowers.
Wow I love this, thank you for the how to. It certainly helps with my next project x
ReplyDeleteHow incredibly effective Georgina! Love the vibrant colour scheme for this one.
ReplyDeleteSo great to meet you yesterday too. Hope you got to see plenty of great stuff as you 'whizzed round' with Jennie! Jenny x
Gosh that is gorgeous, made me want to play when I should be working lol. Elizabeth xxx
ReplyDeleteReally like that, the texture and colours, it's so pretty.
ReplyDeleteoh how beautiful, love the sunny colours you've used
ReplyDeleteClaire xx
Lovely project, the bright colours look great.
ReplyDelete